Home EV Charger Installation Cost: What to Expect
Most US homeowners pay roughly $800–$2,500 for a standard hardwired Level 2 installation, while an existing suitable 240V outlet can bring it down to about $300–$800 and a panel or service upgrade can push it past $3,000. The biggest variable is not the charger — it is your electrical panel capacity, circuit run, and local permit requirements.
Home EV charger installation cost in the United States usually lands between about $800 and $2,500 for a standard hardwired Level 2 circuit, drops to roughly $300–$800 when a suitable 240V outlet already exists, and climbs past $3,000 when the panel or electrical service has to be upgraded. The honest answer is that your quote depends less on the charger you buy than on your house, your panel, and your local permitting rules.
- Compatibility: Verify your vehicle inlet (J1772 or NACS/SAE J3400) and remember an AC adapter never.
- Performance: Circuit capacity, EVSE amperage setting, and the vehicle’s onboard AC charger all cap your.
- Safety: Panel load calculations, permits, inspections, and manufacturer instructions are not optional — use a.
- Cost: Installation is a one-time capital cost; electricity rate, charging losses, and driving efficiency drive.
Home EV Charger Installation Cost in 2026: Quick Answer and Assumptions
Typical installed cost ranges: about $300–$800 with an existing 240V outlet, $800–$2,500 for a standard hardwired Level 2 circuit, and $3,000–$7,000+ with panel or service upgrades
These are planning ranges for licensed residential work in the US, not verified quotes. A short run in an attached garage with exposed framing sits at the low end. A detached garage, a long conduit run, a finished-wall retrofit, or trenching pushes toward the high end. Any electrical panel work is a separate scope with its own labor, materials, and often utility coordination.
| Scenario | Typical installed range | Why it matters |
|---|---|---|
| Existing, suitable 240V outlet | $300–$800 | Mostly mounting, verification of the circuit, and labor |
| New hardwired Level 2 circuit, short run | $800–$2,500 | Dedicated circuit, breaker, conductor, permit, inspection |
| Panel upgrade or new service | $3,000–$7,000+ | Panel capacity, larger scope, possible utility involvement |
One caveat on the cheapest row: an existing 240V outlet only counts if it is a dedicated circuit rated for continuous EV charging, in good condition, and acceptable under the equipment instructions and your local code. A dryer outlet is not automatically a valid answer, and reusing one usually means giving up the appliance.
Cost formula: equipment + labor + permits + panel work + optional upgrades
Every quote decomposes into those five buckets. Optional upgrades are where estimates quietly diverge: a load-management device to avoid a service upgrade, a longer cable, an outdoor-rated enclosure, a subpanel, conduit runs, drywall repair, trenching and landscaping restoration, and any utility service change. Ask which of these are in scope and which are excluded.
What a standard quote usually includes—and what it leaves out
A typical quote covers the EVSE if you bought it through the installer, the dedicated circuit wiring, the breaker, mounting hardware, labor, basic testing, and sometimes the permit filing. It often leaves out drywall patching, paint, trenching, panel upgrades, utility fees, load-management hardware, sales tax, and adapter purchases. Get the exclusions in writing before you sign, because “install” means different things to different contractors.
Equipment Costs and Charger Specs That Move the Price
Level 1 vs Level 2 EVSE: amperage, kW, and your vehicle’s onboard charger limit
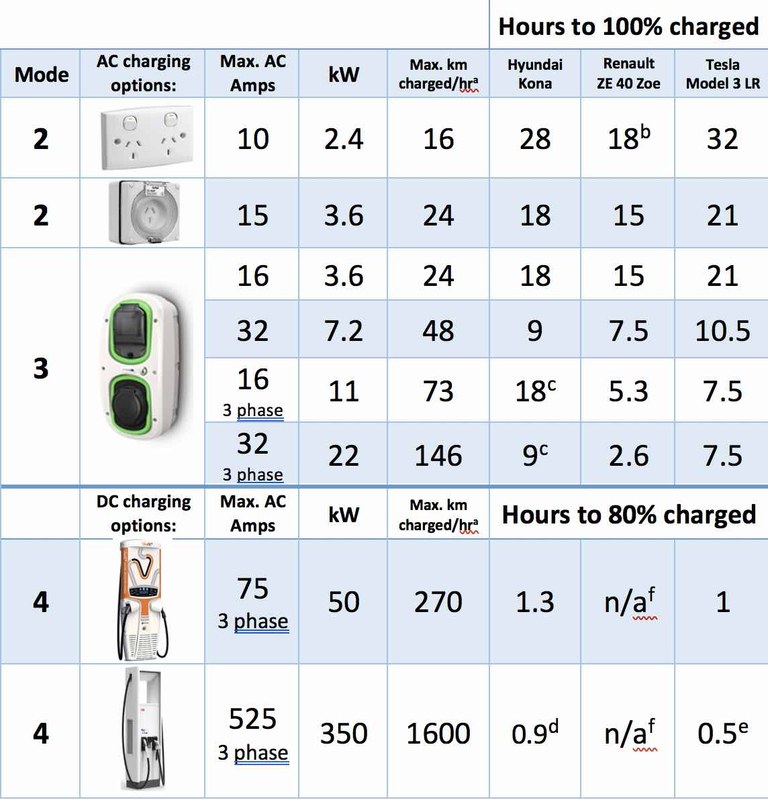
Level 1 uses a standard 120V household outlet and typically delivers somewhere around 1.2–1.4 kW, which is fine for low-mileage drivers but slow for most commuters. Level 2 uses 240V and is available in a wide range of amperages, commonly from 16 A up to 48 A.
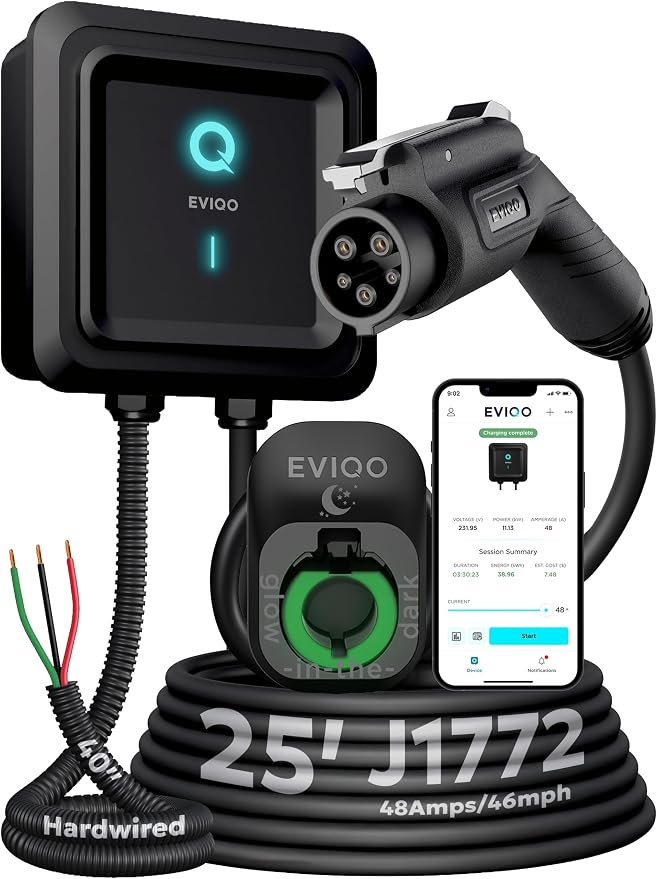
Power math is straightforward: kW ≈ volts × amps ÷ 1,000. At a nominal 240V, a 40 A EVSE works out to roughly 9.6 kW and a 48 A unit to roughly 11.5 kW. But the EVSE setting is only one of three limits. The circuit capacity and the vehicle’s onboard AC charger also cap the actual rate. Many EVs accept only 7.2 kW or 9.6 kW of AC power regardless of what the wall unit can deliver, so if you are weighing amperage tiers, it helps to check whether 40 amps is enough for a Level 2 charger for your driving before paying for headroom you cannot use. The same logic applies when sizing a bigger unit; see how fast a 48 amp EV charger actually is once the onboard charger limit is applied.
Connectors in the US: J1772, NACS/Tesla, and when an adapter matters
Home AC charging in the US now comes in two connector families. J1772 has been the long-standing standard for non-Tesla vehicles, while NACS — standardized as SAE J3400 — is being adopted across many new vehicles and is the connector Tesla has used for years. If your EV has a NACS inlet and your EVSE has a J1772 cable, you need a J1772-to-NACS AC adapter, and the reverse applies if you own an older EV and a NACS EVSE.
Adapters are not the same product across modes. An AC adapter handles Level 1 and Level 2 charging only. It does not enable DC fast charging, and a DC adapter is a separate, more expensive, and more thermally demanding component.
Cable length, weather rating, smart features, load management, and warranty/support
Common cable lengths are 18 to 25 feet, and the difference matters if your parking spot is not directly beside the mounting location. For outdoor mounting, verify the enclosure rating and the manufacturer’s stated operating temperature range rather than assuming weather resistance from the housing. Smart chargers add app accounts, Wi-Fi or cellular connectivity, firmware updates, scheduling, and sometimes utility demand-response integration — ask what still works if the cloud service is discontinued. Load management hardware can measure the whole-home draw and throttle the EVSE, which in some homes avoids a service upgrade entirely. Finally, read the warranty term and how support is handled in the US.
Installation Costs: Labor, Circuit Run, Panel, and Permits
Plug-in vs hardwired: code, GFCI, and cost trade-offs
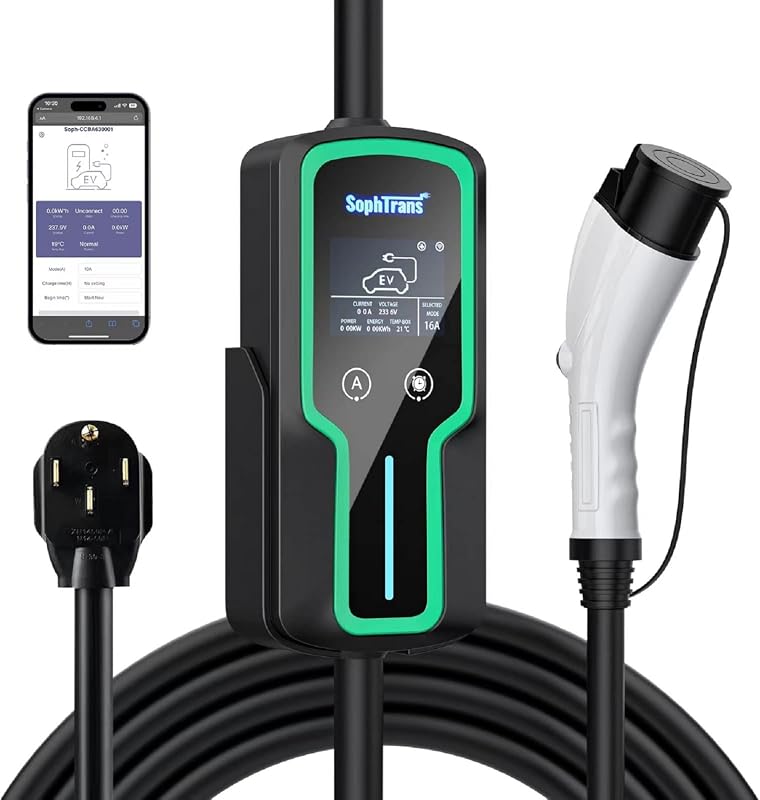
Uses a compatible 240V receptacle on a dedicated circuit. Easier to move or replace, but the receptacle must be rated for continuous EV load and any GFCI requirement depends on your equipment instructions and local code.
Connects directly to the circuit, supports higher continuous amperage, and removes receptacle wear as a failure point. Requires a qualified electrician and usually a permit and inspection.
Plug-in setups are often cheaper because the electrician installs a receptacle rather than opening the unit, and you can take the EVSE with you when you move. Hardwired setups tend to cost more up front but are the usual choice for higher-amperage units and for outdoor installations where fewer connection points is an advantage.
Circuit and panel implications: load calculation, service size, and local code
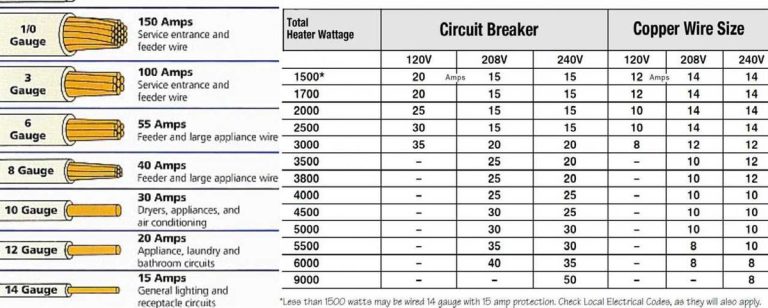
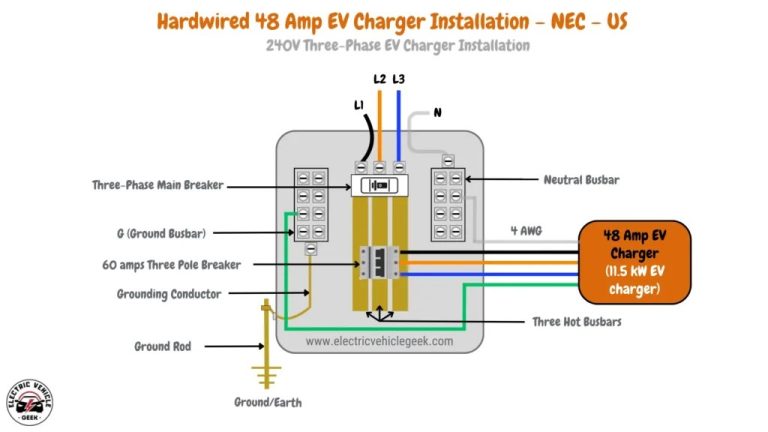
This is where most cost surprises live. The electrician performs a load calculation on the whole house to determine whether the existing service can support a new continuous load. A 48 A EVSE generally requires a 60 A circuit — the details are worth reviewing if you are planning that size, since a 48 amp EV charger and a 60 amp circuit are paired for continuous-load reasons rather than convenience. Conductor sizing is a separate calculation that depends on the run length, the wiring method, and the termination temperature ratings, which is why 48 amp EV charger wire size questions come up so often in install planning. A 100 A service may accommodate a smaller EVSE without changes, or it may not, depending on the rest of the home’s loads.
Permits, inspections, and when a panel or service upgrade is required
A panel upgrade is typically triggered when the load calculation fails, when there is no physical space for a new breaker, or when the existing panel or service is obsolete or damaged. That work is meaningfully more expensive than a circuit install and can require utility coordination and a temporary power interruption.
Charging Cost Math: Electricity Rate, kWh, Losses, and Time-of-Use
Formula for cost per charge and cost per mile
The formula is: energy drawn from the wall = kWh added to the battery ÷ charging efficiency, then multiply by your all-in electricity rate. Cost per mile is that total divided by the miles you actually gain. Here is a labeled example, not a prediction of your bill.
State assumptions; rates, taxes, time-of-use pricing, demand charges, and losses vary by utility and season.
Charging losses: Level 1, Level 2, and cold-weather overhead
Level 2 AC charging typically loses somewhere in the range of 5–15% between the wall and the battery, mostly in the vehicle’s onboard charger and AC-to-DC conversion. Level 1 tends to be less efficient in practice because longer sessions mean more time with the vehicle’s electronics awake. Cold weather adds a different kind of overhead: energy used to warm the battery or cabin shows up on your meter but may not translate into range. Treat all of these as estimates and label them as such.
Time-of-use pricing, demand charges, and off-peak scheduling
Many utilities offer time-of-use plans with cheaper overnight windows, and some residential rates include demand charges that are triggered by short high-power draws. A smart EVSE with scheduling can shift charging into the cheapest window, but verify the current rate structure and any enrollment requirements with your utility, since these programs change frequently. Taxes and fixed fees also belong in the comparison.
Battery Health and Convenience: Manufacturer Guidance vs General Patterns
State of charge, temperature, charging power, and thermal management
There is no universal state-of-charge rule that applies to every EV. Some manufacturers recommend a daily charging limit well below 100% for certain lithium-ion chemistries, while others recommend periodically charging to full for packs with different chemistry. The vehicle manual is the authority here, not a general internet rule. Temperature and the pack’s thermal management system often matter more than the exact percentage.
DC fast charging context and home Level 2 trade-offs
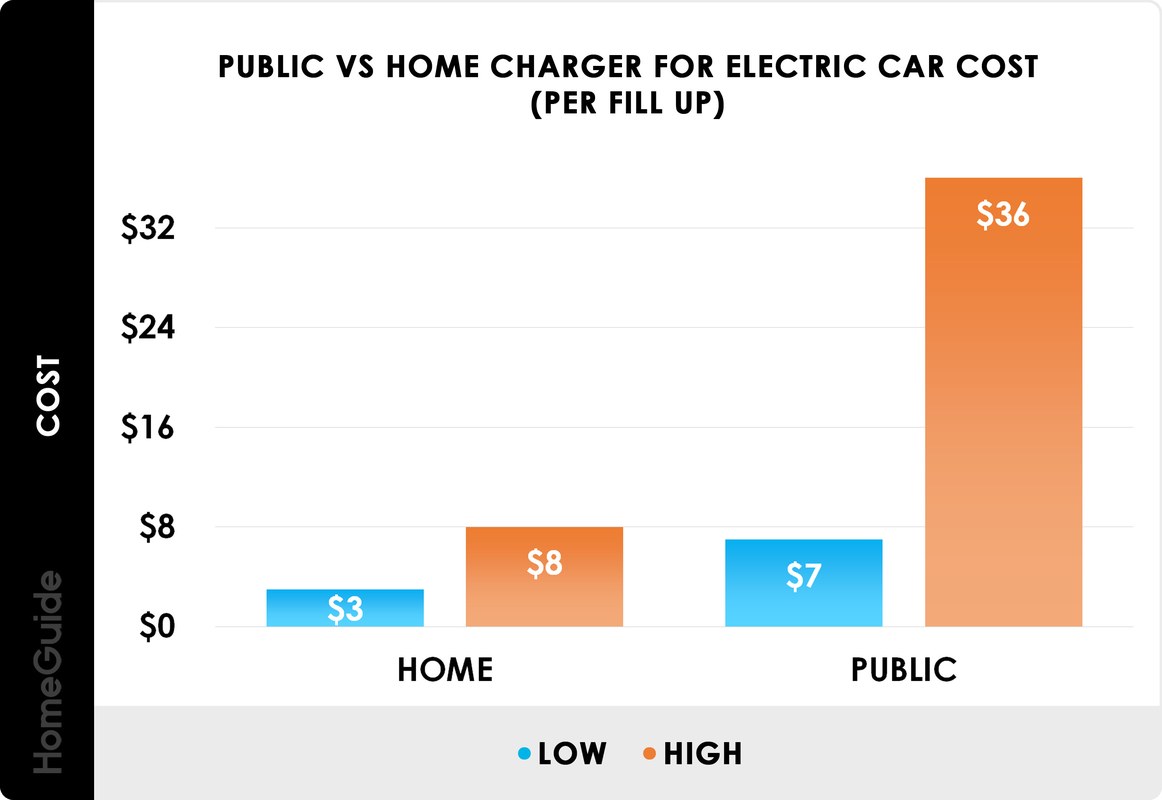
Frequent DC fast charging, especially at high state of charge and in high ambient temperatures, is generally considered more stressful on cells than AC charging. Home Level 2 charging is slower, gentler, and almost always cheaper per kWh. The trade-off is convenience: Level 2 is plenty for overnight replenishment but not for a mid-day top-up before a long drive.
Chemistry, battery age, warranty, and daily convenience
Battery chemistry, pack age, and thermal design all shape how a given charging habit affects long-term capacity. Warranty coverage for capacity loss is separate from the basic vehicle warranty on most EVs, and the terms differ by manufacturer. For most owners, the practical question is simpler: does your home setup reliably get the car to the state of charge you need before you leave?
Range and Efficiency Factors That Change Your Real Cost per Mile
mi/kWh or Wh/mi: converting efficiency into dollars per mile
Efficiency is the bridge between electricity price and driving cost. At 3.5 mi/kWh, one dollar of electricity at $0.16/kWh buys roughly 21.9 miles before losses, or about 19.7 miles after a 10% charging loss. That works out to roughly $0.05 per mile. A less efficient vehicle at 2.5 mi/kWh costs proportionally more per mile at the same rate.
Speed, weather, HVAC, elevation, payload, tires, and battery temperature
Highway speed increases aerodynamic drag sharply, and cold temperatures reduce usable range while adding HVAC load. Elevation gain, heavy payloads, underinflated or high-rolling-resistance tires, and a cold-soaked battery all push real-world efficiency below the label. These factors change your cost per mile, not your installation cost.
Why installation cost is separate from ongoing energy cost
Installation is a one-time capital cost that depends on your electrical system. Energy cost is a recurring operating cost that depends on your utility rate, your efficiency, and how much you drive. Mixing the two makes comparisons misleading, especially when a cheaper installation locks you into a slower charging rate you later regret.
Adapter and Compatibility Check for Home Charging
Source and destination connectors: what an adapter can and cannot change
An adapter changes the physical and electrical interface between the EVSE cable and the vehicle inlet. It does not change the vehicle’s maximum accepted AC power, the EVSE’s output setting, the circuit capacity, or the charging protocol. If your car accepts 7.2 kW, an adapter will not unlock 11.5 kW.
AC vs DC adapter direction, power limits, thermal/safety, and firmware/vendor rules
Direction matters. A J1772-to-NACS adapter and a NACS-to-J1772 adapter are different parts with different mechanical and electrical requirements. DC adapters operate at far higher voltage and current and carry additional thermal and safety considerations. Some manufacturers and charging networks restrict which adapters may be used, and firmware or authorization rules can change over time. Verify against the vehicle manufacturer’s and EVSE manufacturer’s current documentation.
Vehicle/network restrictions and when an adapter beats replacing your EVSE
If you already own a working Level 2 EVSE and you change vehicles, a verified AC adapter is usually far cheaper than replacing the unit and possibly the circuit. If you are buying new and expect to keep the car long term, matching the connector natively avoids an extra failure point.
Comparing Quotes and Choosing the Right Setup for Your Situation
Same criteria side by side: equipment, amperage, install scope, warranty, smart features
Ask every contractor to quote the same scope: EVSE model and amperage, plug-in or hardwired, circuit size, conductor type and run length, permit and inspection handling, load-management hardware if any, warranty terms, and whether drywall repair or trenching is included. Quotes that differ in scope are not comparable, even when the totals look similar.
Who each option fits: renters, homeowners, short commutes, long commutes, cold climates
Renters and anyone likely to move within a year are usually best served by a plug-in setup or a portable Level 1/2 unit that travels with them. Homeowners with short commutes may find a 32 A or 40 A hardwired circuit is more than enough. Long commuters and owners of vehicles with large packs benefit from higher amperage if the panel supports it. Cold-climate owners should prioritize a weather-rated installation, a garage or covered mounting where possible, and a charger with reliable scheduling.
Questions for electricians and evidence limits on 2026 cost estimates
Ask whether the load calculation was performed and documented, whether a permit and inspection are required locally, what happens if the panel fails inspection, whether the EVSE amperage can be dialed down later, and what the warranty covers if the unit fails after installation. Be aware that published cost ranges, including the ones in this article, are planning estimates rather than verified quotes. Labor markets, material prices, permitting fees, and utility requirements differ enough that only a site-specific bid from a licensed electrician in your area can tell you what your installation will actually cost.
Frequently Asked Questions
Planning ranges are roughly $300–$800 if a suitable dedicated 240V outlet already exists, $800–$2,500 for a new hardwired Level 2 circuit with a short run, and $3,000–$7,000 or more if a panel or service upgrade is required. These are estimates, not quotes. Labor rates, conductor runs, permitting fees, and panel condition vary enough that only a site-specific bid is reliable.
Often yes, but it depends on your state, county, and city, and on whether the work is a new circuit, a receptacle replacement, or a hardwired install. Some jurisdictions allow minor work without a permit; many do not. Check with your local permitting authority before work starts, and ask your electrician who is responsible for filing and for the inspection.
Mains-voltage EVSE installation is safety-sensitive and usually requires a load calculation, correct overcurrent protection, proper grounding, and a permit and inspection. If you are not qualified and licensed where required, the safest next step is to hire a qualified electrician. Bypassing overcurrent protection, grounding, torque specifications, or inspection requirements creates real fire and shock risk.
It depends on how much you drive and your all-in electricity rate. As an example, adding 60 kWh with a 10% charging loss draws about 66.7 kWh from the wall, which costs roughly $10.67 at $0.16 per kWh. Your rate, taxes, time-of-use windows, and any demand charges will change that number, so check your current utility tariff.
Not always. A load calculation determines whether your existing service can carry the new continuous load. If it can, a new breaker and circuit may be all you need. If it cannot — or if the panel has no space or is obsolete — an upgrade or a load-management device may be required. A licensed electrician should make that determination on site.
Match the connector to your vehicle inlet. J1772 remains common on older EVs, while NACS (SAE J3400) is used on many newer vehicles. If you own a working EVSE in the other connector type, a verified AC adapter is usually cheaper than replacing the unit and circuit. Confirm adapter direction and power limits with the vehicle and EVSE manufacturer documentation.